
Raspberry Pi 5: Your AI Home Hub
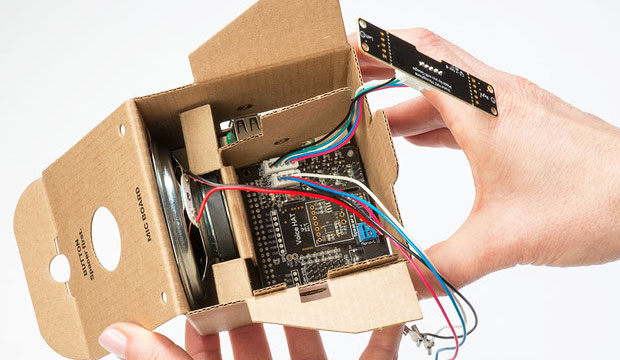
For years, the promise of a truly smart home felt locked behind expensive ecosystems and data-hungry corporations. Now, thanks to the Raspberry Pi 5, that’s changing. Building your own AI home assistant isn’t just a fun project; it’s a statement about owning your technology and protecting your privacy. It's a shift away from sending your voice recordings to the cloud and towards processing everything locally.
A DIY approach offers a level of customization you simply can’t get with off-the-shelf devices. Want a voice command that does exactly what you want, with no compromises? You can build it. Concerned about data security? You control the hardware and the software. And let's be honest, it can be significantly cheaper in the long run than subscribing to multiple smart home services.
The evolution of home assistants has been interesting. We started with simple remote controls, moved to cloud-connected voice assistants, and now we're seeing a push towards local control. This isn't about rejecting voice assistants entirely; it's about reclaiming control over our data and creating a system that truly works for us. The Raspberry Pi 5 is the perfect foundation for this new era of smart homes.
The Raspberry Pi 5, with its increased processing power and improved connectivity, is a game changer for this kind of project. It’s powerful enough to handle the demands of voice recognition, text-to-speech, and complex home automation tasks. It's a small computer that can truly be the brain of your smart home.
Software Choices: Home Assistant & Beyond
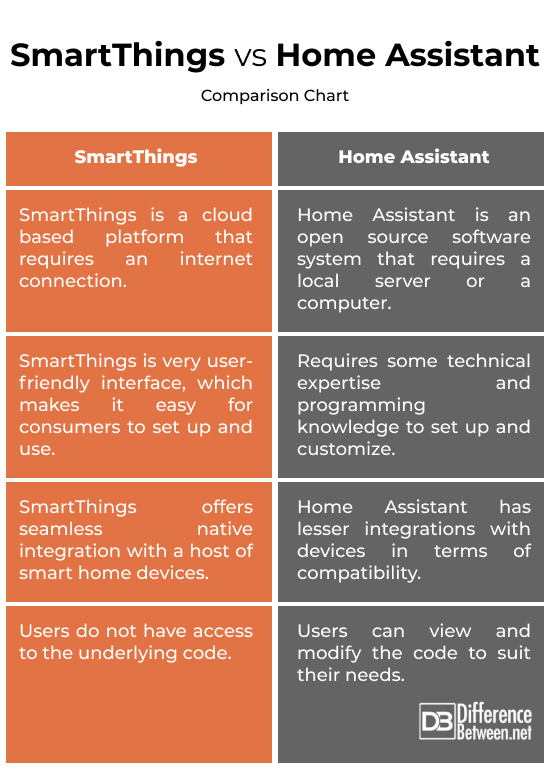
When it comes to software, you have options, but for most people building a DIY AI home assistant, Home Assistant is the clear frontrunner. It’s an open-source home automation platform that's incredibly versatile and has a huge, active community. This means extensive documentation, readily available support, and a constant stream of new integrations.
Home Assistant shines because it’s designed to be local-first. While it can integrate with cloud services if you choose, it’s perfectly capable of running entirely on your own network. This is crucial for privacy and reliability. You don’t want your lights to stop working just because your internet connection goes down. With the 2024.4.4 release, Home Assistant has made significant strides in native AI integration, simplifying the process of adding voice control and other AI-powered features.
Alternatives like OpenHAB exist, and are powerful in their own right, but they often have a steeper learning curve and a smaller community. For someone new to DIY home automation, Home Assistant offers the most accessible path to success. It's designed to be user-friendly, with a visual interface and a relatively straightforward configuration process.
The local-first approach isn’t just about privacy; it’s also about responsiveness. Processing voice commands locally means there's no delay waiting for a cloud server to respond. Your commands are executed almost instantaneously, creating a much more fluid and natural experience. This is especially important for time-sensitive automations, like turning on lights when you enter a room.
- Home Assistant: Open-source, large community, excellent integrations, local-first.
- OpenHAB: Powerful, flexible, but steeper learning curve.
- Other options: Node-RED (for visual automation), Domoticz (simpler interface).
Platform Comparison: Home Assistant vs. OpenHAB vs. Node-RED (Late 2026)
| Ease of Setup | Customization Options | Community Support | AI Integration | Hardware Requirements |
|---|---|---|---|---|
| Home Assistant | Good | Excellent | Good | Moderate - benefits from Raspberry Pi 5's increased processing power, but can run on less. |
| OpenHAB | Moderate | Excellent | Good | Moderate - generally requires more configuration and a slightly more powerful device than Home Assistant. |
| Node-RED | Excellent | Excellent | Moderate | Low - can run effectively on minimal hardware, including older Raspberry Pi models. |
| Home Assistant (with Blueprints) | Good | Good | Good | Moderate - benefits from Raspberry Pi 5's increased processing power, but can run on less. |
| OpenHAB (with Rules Engine) | Moderate | Excellent | Moderate | Moderate - generally requires more configuration and a slightly more powerful device than Home Assistant. |
| Node-RED (with contrib nodes) | Excellent | Good | Moderate | Low - can run effectively on minimal hardware, including older Raspberry Pi models. |
Illustrative comparison based on the article research brief. Verify current pricing, limits, and product details in the official docs before relying on it.
Voice Recognition: Whisper & Local Models
The heart of any voice assistant is its ability to understand what you’re saying. OpenAI’s Whisper model is a popular choice for voice recognition, and it’s surprisingly accurate. You can integrate Whisper with Home Assistant, but it relies on sending your audio data to OpenAI’s servers, which defeats some of the privacy benefits of a DIY setup.
Running voice recognition models locally is the ideal solution for privacy and responsiveness. However, it requires more processing power. The Raspberry Pi 5 is capable of running smaller models effectively, but larger, more accurate models may struggle. The trade-off is between accuracy and speed – a larger model will be more accurate but will take longer to process your voice commands.
Several alternatives to Whisper are designed for edge devices, meaning they can run efficiently on low-power hardware. These models might not be as accurate as Whisper, but they offer a good balance between performance and privacy. Some projects are focused on distilling larger models into smaller, more efficient versions that can run on Raspberry Pi hardware.
Consider the resources available on your Raspberry Pi 5. A model with billions of parameters will likely be too demanding. Look for models specifically optimized for edge computing or consider quantizing a larger model to reduce its size and computational requirements. Experimentation is key to finding the right balance for your needs.
Text-to-Speech: Human-Sounding Voices
Voice recognition is only half the battle; your assistant also needs to be able to talk back to you. This is where text-to-speech (TTS) comes in. While many TTS engines sound robotic and unnatural, ElevenLabs has emerged as a leader in generating incredibly realistic, human-sounding voices.
Integrating ElevenLabs with Home Assistant is relatively straightforward. You’ll need an ElevenLabs account and an API key. This allows Home Assistant to send text to ElevenLabs, which then converts it into speech and sends the audio back. However, ElevenLabs is a cloud-based service, so your voice data will be processed on their servers. They do have a strong privacy policy, but it’s something to consider.
Using a cloud-based TTS service like ElevenLabs comes with a cost. They offer various subscription plans based on the number of characters you generate each month. Alternatively, you can run a local TTS engine on your Raspberry Pi, but the quality may not be as high. Open-source options like espeak and PicoTTS are available, but they tend to sound robotic.
The choice between a cloud-based and a local TTS engine depends on your priorities. If you value natural-sounding voices above all else, ElevenLabs is a great option. If you’re concerned about privacy or want to avoid ongoing costs, a local TTS engine might be a better choice, even with its limitations.
Connecting to Your Smart Home
Once you have voice recognition and TTS working, the next step is to connect your AI assistant to your smart home devices. Home Assistant supports a vast number of integrations, covering most popular protocols and brands. Common protocols include Zigbee, Z-Wave, and Wi-Fi.
Zigbee and Z-Wave are mesh networking protocols designed specifically for smart home devices. They offer excellent reliability and low power consumption. You’ll need a Zigbee or Z-Wave USB dongle to connect your Raspberry Pi to these networks. Wi-Fi devices connect directly to your home network, but can be less reliable due to interference.
Home Assistant’s integrations handle the communication with your devices. For example, if you have Philips Hue lights, you’ll install the Hue integration and follow the on-screen instructions to pair your lights with Home Assistant. Once paired, you can control your lights from the Home Assistant interface or with voice commands.
Compatibility issues can sometimes arise. Not all devices are fully supported by Home Assistant, and some may require custom integrations. Troubleshooting often involves checking the Home Assistant documentation, searching online forums, and experimenting with different configurations. Don't be afraid to ask for help from the Home Assistant community.
Building Custom Commands & Automations
The real power of a DIY AI assistant lies in its ability to be customized. Home Assistant’s automation features allow you to create custom voice commands and automate complex tasks. You can define triggers (e.g., a specific voice command) and actions (e.g., turning on a light, adjusting the thermostat).
Let’s say you want to create a "Good night’ routine. You could set up an automation that, when you say ‘Good night,’ locks your doors, turns off all the lights, sets the thermostat to a comfortable temperature, and plays some relaxing music. This kind of automation is easy to create using Home Assistant"s visual editor.
For more advanced automation logic, you can use Node-RED, a visual programming tool that integrates seamlessly with Home Assistant. Node-RED allows you to create complex workflows with conditional logic, loops, and data manipulation. It’s a great option for automating tasks that require more than a simple trigger-action relationship.
Templates and variables are your friends. They allow you to create commands that are more flexible and reusable. For example, you could create a template that allows you to control any light in your home by simply saying "Turn on the [light name] light.’ Home Assistant will automatically replace ‘[light name]" with the actual name of the light you specified.
- Automations: Define triggers and actions based on events or voice commands.
- Node-RED: Visual programming tool for complex workflows.
- Templates: Create reusable command structures.
- Variables: Add flexibility and dynamic behavior to your automations.
Privacy & Security Considerations
Running your own AI assistant offers significant privacy advantages, but it also comes with security responsibilities. Because you’re processing data locally, you’re in control of who has access to it. However, you need to take steps to protect your system from unauthorized access.
Secure your Raspberry Pi with a strong password and keep the operating system and Home Assistant software up-to-date. Regularly update the software to patch security vulnerabilities. Configure your firewall to restrict access to your Raspberry Pi from the internet. Only open the ports that are absolutely necessary.
Be mindful of the integrations you install. Only install integrations from trusted sources. Review the permissions requested by each integration before installing it. If an integration asks for more permissions than it needs, it’s a red flag.
Exposing your Home Assistant installation to the internet can be convenient for remote access, but it also increases the risk of attack. Use a secure remote access method, such as a VPN, and enable two-factor authentication. Regularly monitor your system for suspicious activity.
Future-Proofing Your System
The field of AI is evolving rapidly, and your DIY home assistant should be able to adapt to new developments. Larger language models (LLMs) are becoming increasingly powerful, and they have the potential to revolutionize home automation. Imagine an assistant that can understand natural language commands with incredible accuracy and respond in a truly conversational manner.
Integrating LLMs into Home Assistant is an ongoing area of research. As LLMs become more efficient and accessible, we can expect to see more tools and integrations that allow you to leverage their capabilities. This could include personalized recommendations, predictive maintenance, and more sophisticated automation scenarios.
Home Assistant is constantly being updated with new features and integrations. Staying up-to-date with the latest software releases is crucial for ensuring compatibility and security. The Home Assistant community is also a valuable resource for learning about new developments and getting help with troubleshooting.
The key to future-proofing your system is to embrace a modular and flexible architecture. Choose components that are easily replaceable and configurable. Be prepared to experiment with new technologies and adapt your setup as needed. The journey of building a DIY AI home assistant is a continuous learning process.


No comments yet. Be the first to share your thoughts!