
Smart home DIY: beyond the basics
The world of smart homes has changed dramatically even in the last few years. What once required professional installation and expensive, proprietary systems is now increasingly accessible to anyone with a bit of technical curiosity. We’ve moved past the point where "smart" meant simply controlling lights with your phone; open-source platforms and readily available components mean you can build genuinely customized automation experiences.
A smart home doesn't have to be a professional install. We're looking at the middle ground: projects you can tackle over a weekend. These focus on learning the hardware rather than just buying a finished product.
Expect some coding and configuration. You don’t need to be a software developer, but a willingness to learn basic scripting and understand the concepts of APIs is helpful. These projects aren’t necessarily easy, but they are achievable, and the satisfaction of building something yourself is well worth the effort. We'll focus on projects that offer a good balance of usefulness and a chance to learn something new.
10 weekend smart home builds
These projects are ordered by complexity. Prices vary based on your local electronics supplier or what you have in your spare parts bin.
1. Automated Plant Watering System: This is a great beginner project. Using a soil moisture sensor, a small water pump, and a microcontroller like an Arduino, you can automate the watering of your plants. Estimated difficulty: Beginner. Approximate cost: $30-$50. Materials: Arduino, soil moisture sensor, submersible pump, tubing, power supply.
2. Smart Mirror: A classic DIY smart home build, a smart mirror displays information like time, weather, and news on a two-way mirror. It typically uses a Raspberry Pi and a monitor. Estimated difficulty: Intermediate. Approximate cost: $100-$200. Materials: Raspberry Pi, monitor, two-way mirror, frame, HDMI cable, power supply.
3. DIY Home Security Sensor: Create your own motion-activated security sensor using a PIR motion sensor and a microcontroller. You can configure it to send alerts to your phone or trigger an alarm. Estimated difficulty: Beginner. Approximate cost: $20-$40. Materials: PIR motion sensor, microcontroller, buzzer or relay, power supply.
4. Voice-Controlled Curtain Opener: Automate your curtains with a stepper motor, a microcontroller, and a voice assistant like Alexa or Google Assistant. Estimated difficulty: Intermediate. Approximate cost: $50-$80. Materials: Stepper motor, microcontroller, relay module, curtain track, power supply.
5. Smart Garage Door Opener: Control your garage door remotely using a relay module, a microcontroller, and your smartphone. This project requires careful wiring and attention to safety. Estimated difficulty: Advanced. Approximate cost: $60-$100. Materials: Relay module, microcontroller, magnetic limit switches, power supply.
6. Whole-Home Energy Monitor: Track your energy consumption in real-time using a current transformer and a microcontroller. This data can help you identify energy-wasting appliances and reduce your electricity bill. Estimated difficulty: Intermediate. Approximate cost: $70-$120. Materials: Current transformer, microcontroller, voltage divider, power supply.
7. Customizable Smart Button: Repurpose a simple button into a smart control for your home. Using a microcontroller, you can program the button to trigger various actions, like turning on lights or playing music. Estimated difficulty: Beginner. Approximate cost: $15-$30. Materials: Button, microcontroller, resistors, power supply.
8. Ambient Lighting System: Create a dynamic ambient lighting system using addressable LED strips and a microcontroller. You can customize the colors and patterns to match your mood or the occasion. Estimated difficulty: Intermediate. Approximate cost: $40-$60. Materials: Addressable LED strip, microcontroller, power supply.
9. DIY Pet Feeder: Automate your pet's feeding schedule with a servo motor, a container for food, and a microcontroller. This is especially useful if you travel frequently. Estimated difficulty: Intermediate. Approximate cost: $40-$70. Materials: Servo motor, food container, microcontroller, power supply.
10. Smart Mailbox Notifier: Get notified when you receive mail with a magnetic contact sensor and a microcontroller. This project requires a weatherproof enclosure and a reliable wireless connection. Estimated difficulty: Intermediate. Approximate cost: $30-$50. Materials: Magnetic contact sensor, microcontroller, wireless module, weatherproof enclosure, power supply.
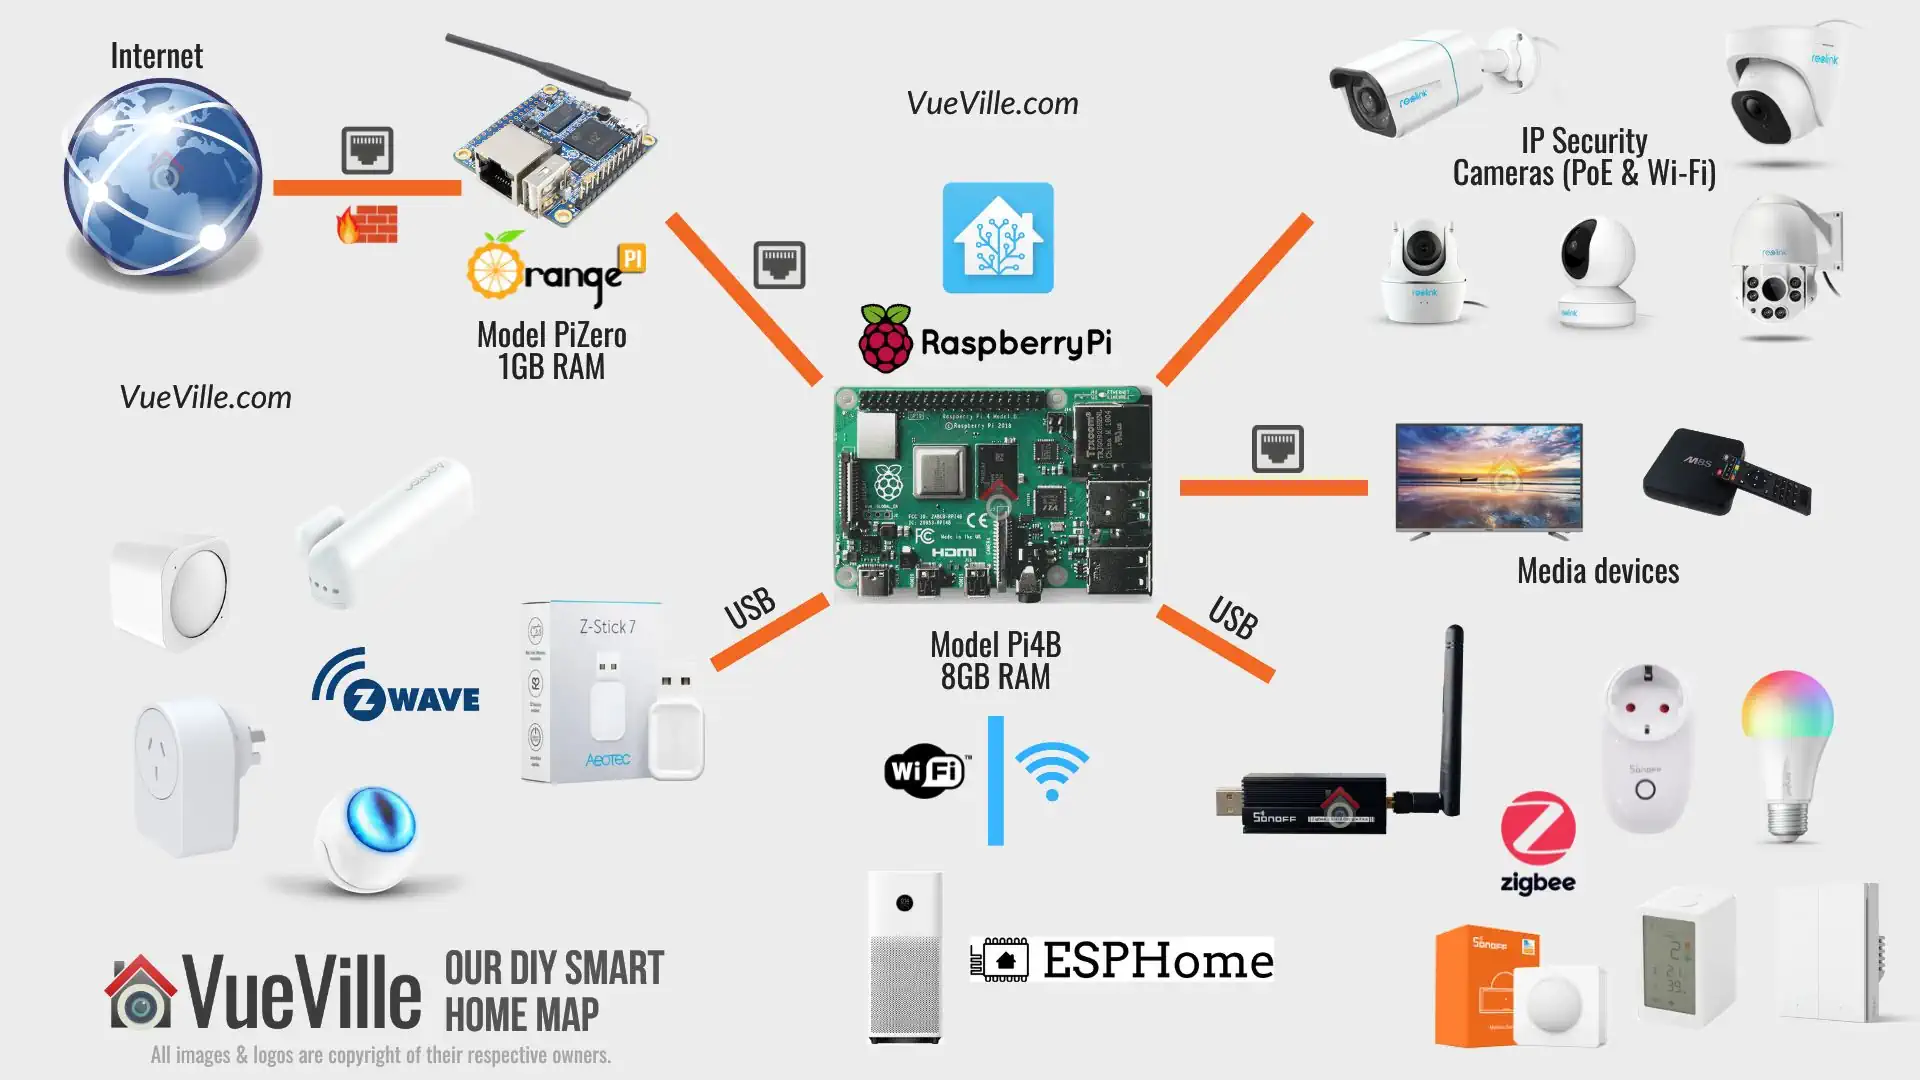
Picking a hub
A central hub is often the brain of a DIY smart home, allowing different devices to communicate and work together. Several options are available, each with its strengths and weaknesses.
Home Assistant is a popular open-source platform known for its flexibility and extensive integration options. It boasts a large community and supports a wide range of devices, but it requires a significant time investment to set up and maintain. It’s powerful, but not necessarily user-friendly.
OpenHAB is another open-source alternative offering similar features to Home Assistant. It's known for its rule engine, which allows for complex automations, but the learning curve can be steep. It also requires a fair amount of technical expertise.
Hubitat Elevation is a commercial hub that strikes a balance between ease of use and customization. It runs locally, which enhances privacy and reliability, but it has a smaller community than Home Assistant or OpenHAB. It costs around $150 for the hub itself.
Cloud-based solutions like SmartThings are easier to set up but offer less control and raise privacy concerns. Your data is stored on the provider’s servers, and you’re reliant on their services. While convenient, they don’t offer the same level of customization as open-source options.
Smart Home Hub Comparison: Home Assistant, OpenHAB, and Hubitat
| Ease of Setup | Customization | Privacy | Device Compatibility | Community Support |
|---|---|---|---|---|
| Home Assistant | Medium - Requires some Linux familiarity | High - Local control focused, strong emphasis on data privacy | Very High - Broad support, constantly expanding through integrations | Very High - Large and active community, extensive documentation |
| OpenHAB | Medium - Steeper learning curve than Home Assistant | High - Local control, configurable data storage options | High - Supports a vast range of technologies, but integration can be complex | High - Established community, good support resources |
| Hubitat Elevation | High - Designed for ease of use, simpler initial setup | Medium - Good customization options, but less flexible than open-source solutions | Medium - Primarily Z-Wave, Zigbee, and some cloud integrations | Medium - Growing community, but smaller than Home Assistant or OpenHAB |
Qualitative comparison based on the article research brief. Confirm current product details in the official docs before making implementation choices.
Tools and safety
Before you start building, make sure you have the right tools. A multimeter is essential for measuring voltage and current. A soldering iron and wire strippers are needed for making connections. A breadboard is useful for prototyping circuits. You’ll also need basic hand tools like screwdrivers and pliers.
Working with electricity can be dangerous. Always disconnect the power before working on any electrical components. Never attempt to work on anything you’re not comfortable with. If you’re unsure about anything, consult with a qualified electrician. Improper wiring can cause fires or electrical shocks.
Proper grounding is crucial for safety. Ensure all your devices are properly grounded to prevent electrical shocks. Use surge protectors to protect your devices from power surges. Understanding basic electrical principles is highly recommended before tackling any of these projects.
Software and development
Many DIY smart home projects rely on software to control the hardware. Python is a popular choice due to its simplicity and extensive libraries for interacting with hardware. The Arduino IDE is the standard environment for programming Arduino boards.
Understanding APIs (Application Programming Interfaces) is key. APIs allow different devices and services to communicate with each other. For example, you might use an API to control your lights with voice commands.
VS Code (Visual Studio Code) is a powerful and versatile code editor. Using Git for version control is a good practice, allowing you to track changes to your code and revert to previous versions if needed. These tools aren't strictly required for every project, but they will make your life much easier.
Fixing common problems
Expect to encounter problems. Connectivity issues are common, especially with wireless devices. Double-check your network settings and ensure your devices are within range of your router. Device compatibility can also be a challenge. Not all devices work seamlessly with all platforms.
Logging is your friend. Implement logging in your code to track what’s happening and identify the source of errors. Debugging involves stepping through your code line by line to find and fix bugs. Online forums and communities are invaluable resources for getting help. Check out the Home Assistant community forums or the OpenHAB mailing lists.
If you get stuck, try resetting your devices to factory settings. This can often resolve software glitches. Before doing so, make sure you understand the reset process for each device, as it varies. Keep detailed notes of what you've tried so you don’t repeat steps unnecessarily.


No comments yet. Be the first to share your thoughts!